STRATEGY INDICATOR – Quickstart Guide
A 5-minute primer to get you trading with the indicator. (Detailed and complete user guide coming soon)
What it does
The STRATEGY Indicator automates the **Ordinary Trader Strategy** — a price action approach that catches institutional liquidity sweeps and flips them into trade entries. It detects setups in real time, draws every step on your chart with explicit entry, stop, and target levels, and tracks live performance with a stats panel.
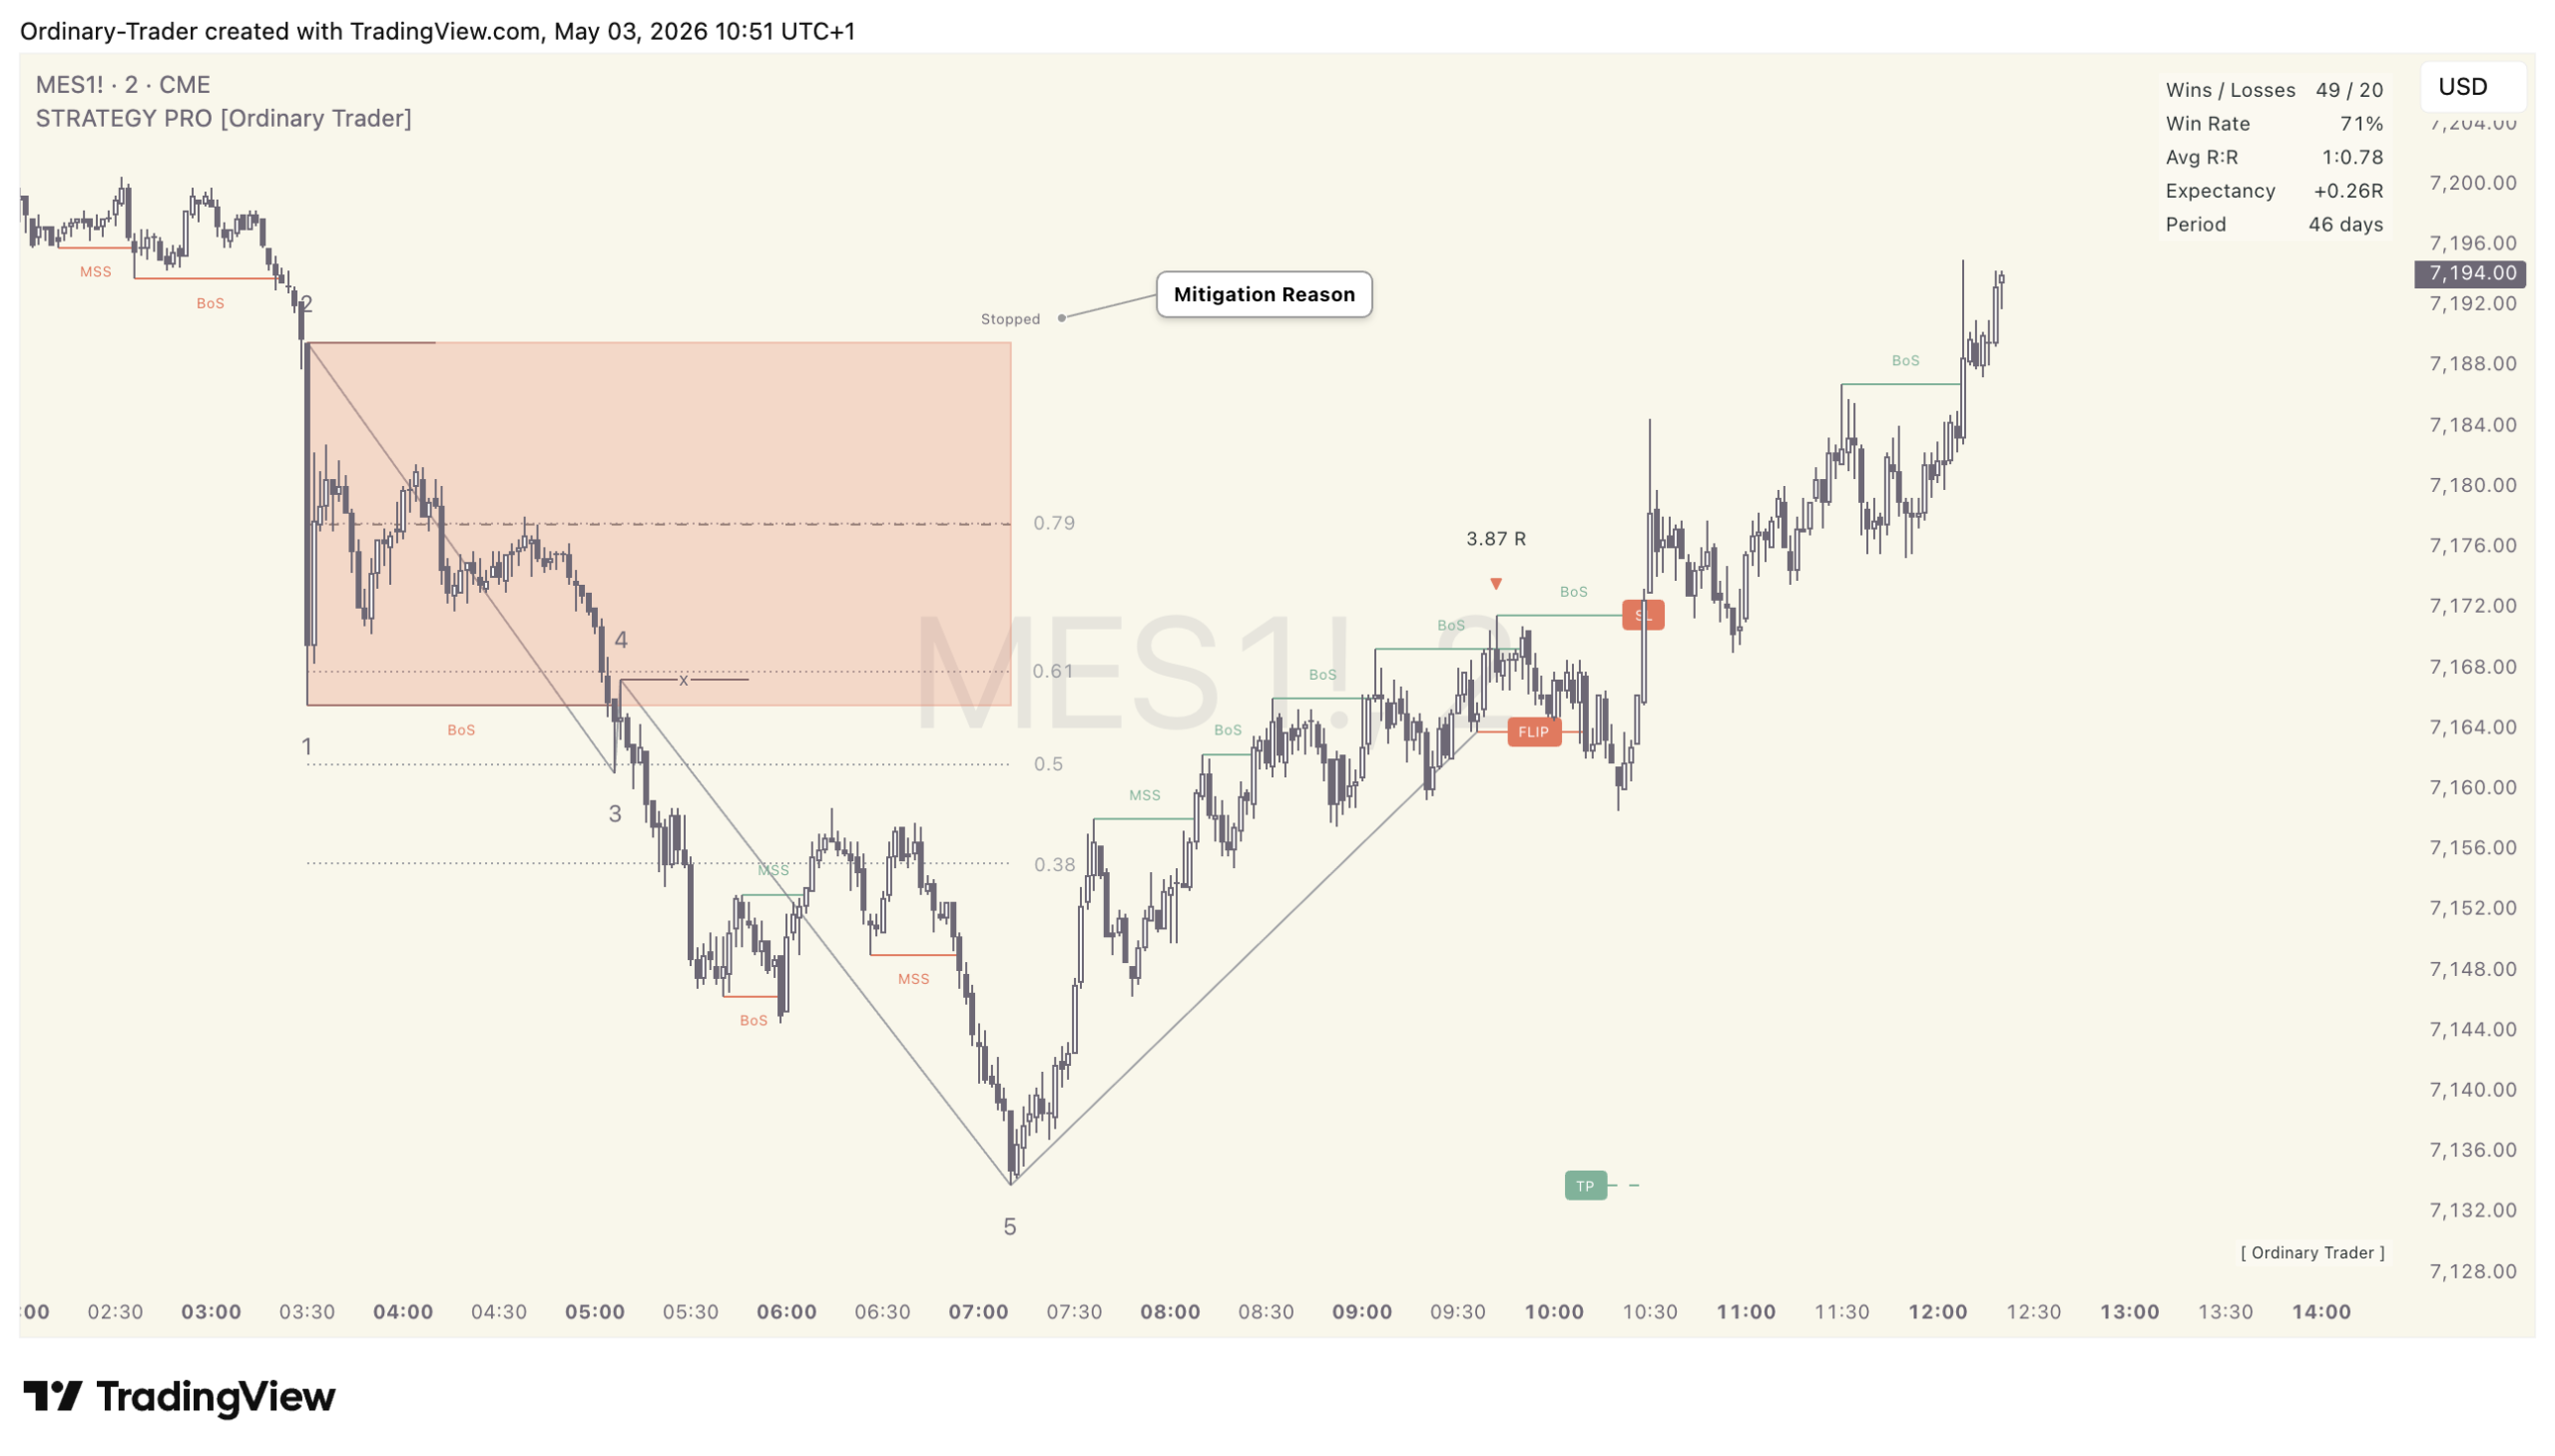
The Setup Sequence
A bullish sequence forms like the below (a bearish setup is the exact mirror):
Once Step 5 completes, you’re watching carefully and waiting for a confirmed flip. When it triggers, a complete trade plan appears on your chart and you are ready to take the trade.

A recent external swing high is broken (candle closes above 1)
The prior external swing low — together 1+2 form **The Zone**
A new high forms above Step 1 — confirms the breakout
A shallow pullback pivot low, locked in once price re-exits The Zone above Step 3. This becomes our **Liquidity** target.
Price action makes another new high above Step 3, then drops back down below Step 4 — this **Liquidity Sweep** takes out Stop Orders resting at Step 4.
Price forms an internal CHoCH (or CISD) which we call The Flip — this is where we plan the trade entry
Our Take Profit target is placed where the TP line is indicated
Our Stop Loss is placed where the SL line is indicated
Your Chart Elements at a Glance
Every element can be toggled, recoloured, and restyled in the **5-Step Sequence · Display** settings group.

**Coloured zone box** = The 1-2 zone — green for bullish setups, red for bearish
**x marker** = The Step 4 liquidity level
**1, 2, 3, 4, 5 labels** = The sequence steps
**TP line + label**= Take profit level
**FLIP line + label** = Trade entry point
**R:R label + ▲ / ▼** = Planned reward-to-risk ratio + trade direction
**SL line + label** = Stop loss level
Did you KNOW
PRO Plan Subscribers have the option to show Early Stage Sequences forming from Stage 4 onwards and Set Alerts to be notified in realtime.
The Trade
When the **FLIP** line is drawn and a candle closes through it, it’s time to place your limit (or market) order:
- **Entry** → at the FLIP line price (or below for better entry and RR)
- **Stop loss** → the **SL** line
- **Take profit** → the **TP** line
The **R:R label** tells you the planned reward-to-risk before you commit. A 1:3.20 R:R means the take profit target is 3.2 × your risk.
For bearish sequences: same structure, just flipped — you go short instead of long.
Five Settings to Know First
With so many powerful features to learn and dial in, things can seem overwhelming at first. Don’t worry — these are the five matter most when you start:
1. **Direction** (Master Settings)
– `Both` shows bull and bear setups. Set to `Bull Only` or `Bear Only` if you have a strong directional bias. i.e If Price action is clearly trending bullish then set the Indicator to show bullish only to clean up the chart.
2. **Last** (5-Step Sequence)
– Limits how many sequences stay visible. Default 10 keeps the chart clean. Bump higher if you want more history or smaller to zoom on just the most recent setup.
3. **Target Mode** (5-Step Sequence)
– Step ` (default): take profit at the methodology’s natural target which is Step 5. (LITE Plan uses Step 5 as standard)
– R-Multiple: take profit at a fixed R-multiple from entry (e.g., 1.5R) — cleaner stats, better R:R but could caps greater upside or extends the sequence beyond step 5 increasing risk of reversal.
4. **Enable Filters** (Master Settings)
– The Master switch for the 9 quality filters. Off = every flip becomes a trade and nothing is filtered. On = only flips that pass your filter stack become viable setups.
5. **EMA filter** (Filters group)
– The single highest-impact filter. Set to Period=50, TF=Chart and Apply At=Flip Creation and you’ll only take trades aligned with the longer-term trend. Recommended for most traders.
Did you KNOW
PRO Plan Subscribers have full access to 9 Powerful filters to dial in the setups according to thier own preference and instrument being traded. LITE Plan Subscribers have two preconfigured filters enabled (EMA and Sequence Age) to help get started.
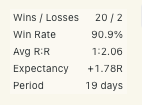
Is It Working? — The Stats Panel
In the top-right corner of your chart, the Stats Panel tracks live performance over the chart’s history:
- Wins / Losses = raw trade count
- Win Rate = % winners
- Avg R:R = average reward-to-risk on wins
- Expectancy = the edge per trade in R units
- Period = how many days of data the stats cover (the look back window is defined by your TradingView Plan)
**Watch Expectancy.** It’s the single most important number that tells you if the methodology has an edge with your dialled in settings:
- Positive (e.g. +0.30R) = Profitable per trade on average — you have a working edge
- Around 0 = Break-even — no edge yet
- Negative = Losing money — wrong settings for the instrument
Recommended Starting Setup
If you’re brand new to the methodology, start here:
- Direction = Both
- Target Mode =Step 5 (default)
- Enable Filters =On
- EMA filter = On, Period 50, Apply At “Flip Creation”
- Age Filter =On (default — keeps the chart on fresh structure)
- All other filters = Off
Run for a few days on your chosen instrument and timeframe. Watch the Stats Panel build up. Note Expectancy. Then start tuning.
What to Do When the Flip Triggers
1. Wait for the candle to close — the flip is confirmed only on a closed bar
2. Check your R:R label — pass on anything below your minimum requirement (e.g. 1:1)
3. Place your order at market or set a limit order for when price pulls back to The Flip with stop at the SL line and take-profit at the TP line
4. Position size so the stop equals 1% (or your chosen %) of account equity
5. Walk away — don’t interfere or try to manage mid-trade
The methodology only works when executed mechanically. Don’t move stops, don’t take profits early unless it really makes sense, don’t try to second-guess.
Common Mitigation Reasons
When a setup doesn’t complete, you’ll see a small annotation explaining why (you will need to enable Mitigated Sequences in the Master Settings.
- Stopped = Valid Flip, trade entered but stopped out — a real loss
- No Flip = Reached Step 5 but the flip never formed — no trade taken
- EMA / Fib / Risk Reward = A filter rejected the flip — no trade taken
- Age = Sequence aged out before completing. This stops Setups spanning 100’s of candles
- Protected = Step 2 (The Protected Low) was breached before creating a Flip — structure broken, sequence cancelled
Next Steps
1. **Add the indicator** to a chart on your preferred instrument and your preferred timeframe. A good place to start is NQ on the 2 MIN Chart.
2. **Watch a few sequences play out** without trading — get a feel for what looks right
3. **Set up the Flip Ready alert** so you’re notified when setups trigger (right-click chart → Add Alert → Condition: STRATEGY PRO → Flip Ready)
4. **Read the full guide** for deeper coverage of the methodology, every setting, tuning advice, and trading practice
For the full user guide, visit [link to full guide]. **Coming Soon**